Showing posts with label drupal 8 features. Show all posts

Monday, 16 December 2019

How to avoid Core CSS and JS from theme in drupal 8?

Sometimes we just want to render our custom css/js, and avoid globally rendered core css or js from every page. So we have to follow given below steps:

Step 1: First go to your theme ".info.yml" file.
Step 2: Then add "stylesheets-remove:" parameter and add css file path of all core files like,
Example: Theme file name is "account.info.yml".
then we just have to add 'stylesheets-remove:' for avoid under write files there..

stylesheets-remove:
  - core/themes/stable/css/system/components/autocomplete-loading.module.css
  - core/themes/stable/css/system/components/ajax-progress.module.css
  - core/themes/stable/css/system/components/align.module.css

 
Step 3: Clear full cache of project.

So this is the easy way to avoid core file from project pages.


Note: How to remove globally CSS from theme of project in drupal 8?
Thursday, 7 February 2019

How to dynamically clear cache in drupal 8?

It's a easy way to clear or remove cache with using this simple code.

Code: \Drupal::service('page_cache_kill_switch')->trigger();

Description: Simple write this code on your function and when your code will hit or run on any page this page cache will automatically triggered and clear.


Note: If have any suggestions or issue regarding 'How to dynamically clear cache in drupal 8?' then you can ask by comments.  

Thursday, 20 December 2018

How to add custom js file in custom module in drupal 8 ?

It is very simple way to add custom JQuery file in custom module, but we have few methods for this.

Method 1: Our custom libraries(js/css) will be apply on all pages of project.
If we want to add custom js file in whole pages of project then we have to use this method.

1. First we have to create js file like 'gallery.js' file in js folder in our custom module.
2. Then we have to create a 'hook.libraries.yml' file means there hook will be module name.
     
Example: Suppose our Module name will be 'gallery' So we will create file with name of     'gallery.libraries.yml' in custom module folder means this file should be placed with '.routing.yml' file.
3. The code for '.libraries.yml' file is..

image_gallery:
  version: 8.4.5
  js:
    js/gallery.js: {}   
  dependencies:
    - core/jquery
  css:
    theme:
      css/gallery.css: {}


Note: There is a library called image_gallery that when included in a page will deliver the 'js/gallery.js' and 'css/gallery.css' file.

4. Then we have to create '.module' file.

Example: Suppose our Module name is gallery so file name will be 'gallery.module'. There our code for attachment of this library to our module is..

<?php
function gallery_page_attachments(array &$attachments) {
   $attachments['#attached']['library'][] = 'gallery/image_gallery';
}
?>

5. Here 'gallery/image_gallery' means 'module name/libraries name' and in the time of controller function return of page will be written like..
return array('#markup' => t($html)); // here $html is return the result for page.   

Method 2: Our custom libraries(js/css) will be apply only on custom module pages of project.  
1. Whole process and file creation will be same but we will not use attachments code in '.module' file.
2. In this case we just have to create '.libraries.yml' file and apply code..

image_gallery:
  version: 8.4.5
  js:
    js/gallery.js: {}   
  dependencies:
    - core/jquery
  css:
    theme:
      css/gallery.css: {}

     
3. Then in the time of controller function return of page will be written like..
   
return [
    '#markup' => t($html),
    '#attached' => array(
        'library' => array(
            'gallery/image_gallery',
        ),
    ),
];       


here 'gallery/image_gallery' means 'module name/libraries name' and '$html' is the written result for page.

Note: If have any suggestions or issue regarding 'How to add custom js file in custom module in drupal 8 ?' then you can ask by comments.   

Tuesday, 11 December 2018

How to use country timezone in our Twig file ?

If we want to change the 'DATE' filter in you TWIG file, its easy to use Timezone.
here is the good example for this issue.

Example:
{{ "now"|date("m/d/Y H:i", "Europe/Paris") }}  //For Europe Paris region timezone
{{ "now"|date("m/d/Y H:i", "Asia/Calcutta") }}  //For Asia Calcutta region timezone
{{ "now"|date("m/d/Y H:i", "Europe/Berlin") }}  //For Europe Berlin region timezone

So same like we can use for other countries region time in our TWIG file.


Note: If have any suggestions or issue regarding 'How to use country timezone in our Twig file ?' then you can ask by comments.  

Thursday, 4 October 2018

How to remove or unset META tag from web page?

If we want to hide or unset or remove META Tag from our web page then we have to use `hook_page_attachments_alter` in `.theme` file.
we have to create an array and pass the name of `META name` which we want to remove or unset from web page.
like..
$unset_meta = [
    'title', // Meta name "title"
    'description', // Meta name "description"
    'keywords', // Meta name "keywords"
    'Generator'     // Meta name "Generator"
];

then with the help of $page['#attached']['html_head'], page attachments html_head we have to check that meta name if exist then we have to unset this.
we are giving here an example for this..

Example:
function moldev_page_attachments_alter(array &$page) { // here moldev is my theme name.
 // Define an array of META tags to remove.
   $unset_meta = [
    'title', // Meta name "title" 
    'description', // Meta name "description"
    'keywords', // Meta name "keywords"
    'Generator'     // Meta name "Generator"   
   ];
  // Check values and delete.
   foreach ($page['#attached']['html_head'] as $key => $value) {
     if (in_array($value[1], $unset_meta)) unset($page['#attached']['html_head'][$key]);
   }
}

if you want to delete/remove/unset any link rel="alternate" and hreflang="en" or any language then follow the below given code.
foreach ($page['#attached']['html_head_link'] as $key => $attachment) {   
          if ($attachment[0]['rel'] == 'alternate' && $attachment[0]['hreflang'] == 'en') {
               unset($page['#attached']['html_head_link'][$key]);
          }
}

Note: If have any suggestions or issue regarding 'How to remove or unset META tag from web page?' then you can ask by comments.  

Tuesday, 11 September 2018

Steps for Add Custom or Add More Language on website.

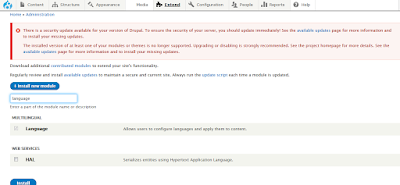
If we want to add custom language or add multiple languages on our drupal website then we have to add and install `Language Module` first.


Install Language module


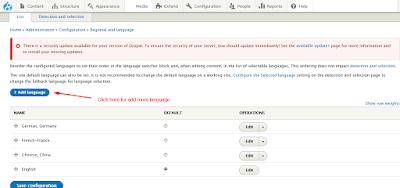
Then click on the Configure link or go with this link "/admin/config/regional/language".
Language List

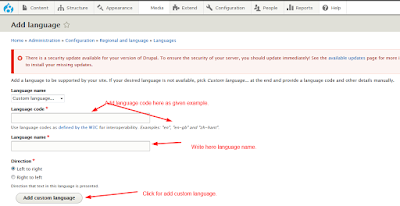
and then you can add custom language by choose last option "Custom Language". After choose you will be redirect in this page.

Choose Custom or other language option
If we are choosing default languages that given by module then automatically will be added on list, but in case of last option custom language we will reach in this page.

Set Custom language code and name

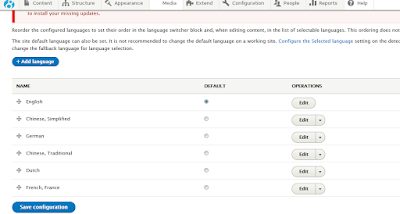
After this you will redirect to listing page of added languages.
Language list
here we can set our default language that will automatically display in language list.

After that we have to check the "Show language selector on create and edit pages" option on content type edit page in "language settings".
Content type edit page for add dropdown option

Then you will be get the language drop-down in body/description type fields on node form.
So this is the simple steps for Add Custom or Add more language in website.


Note: If have any suggestions or issue regarding 'Steps for Add Custom or Add More Language on website.' then you can ask by comments.  

Thursday, 9 August 2018

drupal 8 images with custom style.

If we want to apply the custom styling on image path then we have to create first with go to Configuration -> media -> image styles or /admin/config/media/image-styles
then click on Add image style and according to requirement choose effect option like Convert, Crop, Resize, Rotate, Scale, Scale and Crop, Desaturate and apply height/width and save it, then get the machine name of your custom create style and apply like this syntax.

Image style listing

Add new image style

Apply Effect


Call the ImageStyle library on header of file.
use Drupal\image\Entity\ImageStyle;

Then get the uri of image..

$path = 'public://images/image.jpg';
$url = ImageStyle::load('style_machine_name')->buildUrl($path);   

OR direct use this syntax..
$product_image = \Drupal\image\Entity\ImageStyle::load('related_products')->buildUrl($nodeload->field_banner_image->entity->getFileUri());   

here 'related_products' is the machine name of custom image style and 'field_banner_image' is the machine name of banner image, and this is $nodeload->field_banner_image->entity->getFileUri() the uri of banner image by node::load.

Note: If have any suggestions or issue regarding 'drupal 8 images with custom style.' then you can ask by comments.

Monday, 6 August 2018

Create custom twig file and include in twig file.

For create custom twig file,
Example 1: We just have to create a file like 'instrument.html.twig' so for include this file simple code is..
     {% include('instrument.html.twig') %}

Example 2: We just have to create a file like 'consumable.html.twig' so for include this file simple code is..
     {% include('consumable.html.twig') %} 

Example 3: We just have to create a file like 'abc.html.twig' so for include this file simple code is..
     {% include('abc.html.twig') %}


Note: If have any suggestions or issue regarding 'include twig file' then you can ask by comments.

Thursday, 2 August 2018

Create custom variable in drupal 8 and render on template file.

We have alternate option for custom variable in drupal 8. Now we will going to describe that how to create custom variable and use on any template file.
here we are going to giving an example with easy steps for custom variable use and render on file.
Example: First we have to take the step on hook_preprocess_node(&$variables). we have to check node value is available or not.
if(isset($variables['node'])){
    $node = $variables['node'];
    $current_node_id = $node->id(); //get the current node id
    $node_type = $node->type->target_id;  //get the current node type
    if($node_type == "products"){  // we are going with example of products content type nodes..
   
    /*  Now we will get the fields by node::load  */
   
    $categoryid = $node->get('field_category')->target_id; //here field_category is Category field machine_name..
        $category_detail = \Drupal\taxonomy\Entity\Term::load($categoryid);
        $variables['category_name'] = $category_detail->name->value;  // get the category name
        $variables['landing_page']  = $category_detail->field_setup_landing_page->value;  // get the field_setup_landing_page field value
       
        /* here 'category_name' and 'landing_page' is our variable keys */
       
        $node_detail = Node::load($current_node_id);                           

        $node_id = $node_detail->id();                   // get the node id
        $node_title = $node_detail->getTitle();          // get the node title
        $node_Published = $node_detail->isPublished();   // get the publish status
        $node_type = $node_detail->getType();            // get the node type
        $node_field_model_value = $node_detail->get('field_model')->value;   // get the field model value
        $node_field_price_value = $node_detail->get('field_price')->value;   // geth the field price value
        $node_field_image_value = $node_detail->get('field_image')->entity->uri->value; // get the field image with single image url

        /* Now put the all values in array with keys for differentiate */
        $arr = array('id'       => $node_id,
                     'title'    => $node_title,
                     'published'=> $node_Published,
                     'type'     => $node_type,
                     'model'    => $node_field_model_value,
                     'price'    => $node_field_price_value,
                     'image'    => $node_field_image_value
        );

        /* Now pass the $arr in final productfields variable like this.. */
        $variables['productfield'] = $arr;
       
        This is our final product fields variable now we have to move on products type twig file because we are working for specially products type of contents.
        Suppose are products type twig file name is 'node--products--full.html.twig'. That file is for products detail pages.
        <ul>
        {% for key, value in productfield %}
       
        <li>{{ key }} | {{ value }}</li>
       
        {% endfor %}   
        </ul>
       
        /* here 'productfield' is same variable name which we are created in 'hook_preprocess_node(&$variables)' hook in .theme file, so we just have to print the array keys and value by for loop in Symphony syntax, So that is the easy way to create custom variable and then render values in twig file. */
    }
       
}

Note: If have any suggestions or issue regarding 'Custom variable in drupal 8 and render on template file.' then you can ask by comments.

Monday, 23 July 2018

Drupal entity render on twig template.

We have few short codes or cheat codes for render views or blocks, entity, menu, field, form on twig template. This will help to publish all these things on twig file in easy way. we have some examples for easy to use these short code, Please have a look,
First thing most important is that we have to install 'Twig tweak' module on site that is required for render views, block and entity on twig file.
link for twig tweak module is https://www.drupal.org/project/twig_tweak

Render View on twig file:
{{ drupal_view('view_machine_name', 'block or view machine_name') }}
example:-  {{ drupal_view('application_resources', 'block_10') }}  

Render Block on twig file: 
{{ drupal_block('block_machine_name', wrapper=false) }}
example:-  {{ drupal_block('bartik_breadcrumbs') }}

Render Region on twig file: 
{{ drupal_region('sidebar_first') }}

Render Entity on twig file:
{{ drupal_entity('block_content', 1) }}

Render entity edit form:
{{ drupal_entity_form('node', 1) }}
/* here 1 is node id.*/

Render entity add form:
{{ drupal_entity_form('node', values={type: 'page'}) }}

Render single entity field:
{{ drupal_field('field_image', 'node', 1) }}
/* here field_image is from node 1 */

Render menu on twig file:
{{ drupal_menu('main') }}  or {{ drupal_menu('footer') }}
/* here main and footer parameter is the name of menu machine_name. */

Render any form on twig file:
{{ drupal_form('Drupal\\search\\Form\\SearchBlockForm') }}
/* here we are calling search block form. */


Note: If have any suggestions or issue regarding 'Drupal entity render on twig template' then you can ask by comments.

Friday, 20 July 2018

Programmatically render Block in a twig template drupal 8.

In drupal 7 syntax of render block in twig template is.

$block = module_invoke('module_name', 'block_view', 'block_delta');
print render($block['content']);

But now in drupal 8 syntax is changed, but first we have to install "Twig tweak" module that provides
a twig extension with useful functions an filters that can improve development experience.
here is the link for twig tweak module, please download from here..
https://www.drupal.org/project/twig_tweak
there will be cheat sheet for drupal 8 that helps in calling/render block or views in twig template file.

Drupal_view render..

Suppose we have to render/call view in twig template then syntax will be
{{ drupal_view('view_machine_name', 'block/page machine name') }}
Example:
{{ drupal_view('product_overview_video', 'block_2') }} 
here 'product_overview_video' is view machine name and 'block_2' is we created 2nd block on this view.

Drupal_block render..
Suppose we have to render/call block in existing block then our syntax will be
{{ drupal_block('block_machine_name', wrapper=false) }}
 Example:
{{ drupal_entity('block_content', 27) }}
here block_content is block machine name and 27 is block id.
OR
 {{ drupal_block('bartik_breadcrumbs') }}
we can direct call block by machine_name like breadcrumbs block. we just have to put the drupal_block function with machine_name and clear the cache and it will work.

Note: If have any suggestions or issue regarding 'Programmatically render Block in a twig template' then you can ask by comments.

Taxonomy terms load in drupal 8.

In drupal 7, we have taxonomy_term_load($tid), taxonomy_term_load_multiple($tids) functions for load the taxonomy term or multiple terms but now in drupal 8 syntax is changed and now Single/Multiple term load by Term::load($tid)
or
Add the name space at the top of the page.
\Drupal\taxonomy\Entity\Term::load($tid);

If we are using Symfony library and calling name space 
use Drupal\taxonomy\Entity\Term;
use Drupal\taxonomy;

or direct use in function calling time like  \Drupal\taxonomy\Entity\Term::load($tid);

Example:
$term_detail_array = \Drupal\taxonomy\Entity\Term::load($tid);
or
$term_detail_array = Term::load($tid); //if we are already using taxonomy library..

Then get the fields detail by $term_detail_array like,

Term id:  $term_detail_array ->tid->value;
Term name:  $term_detail_array ->name->value;
Term manually added field:  $term_detail_array ->get('field_machine_name')->value;  // manually added field value..
Term image field:  $term_detail_array ->field_machine_name->entity->getFileUri();

 If we have field with entity reference then field value will be in form of $term_detail_array ->get('field_machine_name')->target_id;
or
If we have field without entity reference then field value will be in form of $term_detail_array ->get('field_machine_name')->value;

Now we will discuss on Term::loadMultiple.
And the syntax is $terms = \Drupal\taxonomy\Entity\Term::loadMultiple($tids); // here $tids is the array of multiple tid..
$terms = \Drupal\taxonomy\Entity\Term::loadMultiple($tids); 
foreach ($terms as $term) {  //then the fields value will be..
$term_id = $term->tid->value;
$term_name = $term->name->value;
$term_file field = $term->field_machine_name->uri;
}
and so on..

Note: If have any suggestions or issue regarding 'Taxonomy terms load in drupal 8' then you can ask by comments.

Thursday, 19 July 2018

User load by mail in drupal 8.

Yes, we can load the user detail by mail id in drupal 8. As per drupal syntax first we have to add user library for classes then we will user drupal load by mail function that is "user_load_by_mail()".

$check_user = user_load_by_mail($mailid);
 if (!empty($check_user)) {
     $uid = $check_user->id();
     $user_detail = \Drupal\user\Entity\User::load($uid);
                $user_id= $user_detail->get('uid')->value;
                $user_roles = $user_detail->getRoles();
                $user_status = $user_detail->isActive();
                $user_name = $user_detail->getUsername();
                $user_body = $user_detail->get('body')->value;               
                $user_email = $user_detail->get('mail')->value;
                $user_created_time = $user_detail->created->value;
                $user_field = $user_detail->get('field_machine_name')->value;  
                $user_loggedin_check = $user_detail ->login->value; // that will return 1 or 0
                if ($user_detail->login->value != 0) {
                    $first_login_data = date('Y-m-d H:i:s', $user_detail->login->value);
                } else {
                    $first_login_data = 'never';
                }
  }

Note: If have any suggestions or issue regarding 'User load by mail in drupal 8' then you can ask by comments.

Thursday, 12 July 2018

Custom login create in drupal 8.

We are trying to clear the code of custom login with authentication. here we have the code.

 // Authentication of username and password..
$uid = \Drupal::service('user.auth')->authenticate($username,$password);
// Get the user id by database and load..
$user = \Drupal\user\Entity\User::load($uid);
// finally pass the user detail array in user login function..
 user_login_finalize($user);

Example:
 Like we have username and password by POST method and fields are.
<input id="login-username" type="text" class="form-control" name="name" value="" placeholder="username">
<input id="login-password" type="password" class="form-control" name="pass" placeholder="password">

so for got these credentials in function the code is.
$username = \Drupal::request()->request->get('name'); // form username
$password = \Drupal::request()->request->get('pass'); // form password

And the final code for login..

 $uid = \Drupal::service('user.auth')->authenticate($username,$password);
 $user = \Drupal\user\Entity\User::load($uid);
 user_login_finalize($user);
 
Note: If have any suggestions or issue regarding 'Custom login create in drupal 8' then you can ask by comments.

Friday, 6 July 2018

Render view fields in custom view template in drupal 8.

First we have to create view according to our requirement and then create the custom view template file, suppose our view machine name is 'customer_story' and on 'block_1', so our template file name will be 'views-view-fields--customer-story--block-1.html.twig'.
and we can render our views fields variables like..

{{ fields.title.content }} //for title field
{{ fields.field_machine_name.content }} //for any other field render.
{{ file_url(fields.field_landing_page_image.content) }} //for image field render
{{ fields.field_page_url.content }}  //for link field render

you can get these variable name by 'custom text field' "Replacement pattern" settings.

Note: If have any suggestions or issue regarding 'Render view fields in custom view template in drupal 8' then you can ask by comments.

Wednesday, 4 July 2018

Drupal 8 base_path and base_path_url.

We have syntax change in drupal 8 for base_path and base_path_url, Please have a look..

  • base_path = base_path();  // This code is for base_url of site.                                                    
  • base_path_url = \Drupal::request()->getpathInfo();  // This code for current page path.
  • Front page = {{ url('<front>') }}  // This code is for front page url.
  • Theme directory path = url('{{ base_path ~ directory }} //This code is for theme's root directory
Note: If have any suggestions or issue regarding 'Drupal 8 base_path and base_path_url' then you can ask by comments.

Check AND /OR use in twig file.

Check AND /OR use in twig file, look at the syntax..

For OR Syntax..

{% if content.field_machine_name|render or content.field_machine_name|render %}
        /* write comment here */
{% endif %}

For AND Syntax..
 
{% if content.field_machine_name|render and content.field_machine_name|render %}
        /* write comment here */
{% endif %} 

Note: If have any suggestions or issue regarding 'Check AND /OR use in twig file' then you can ask by comments.

Check twig file field is empty or not.

For check Twig file field is empty or not, look at the syntax..
 
{% if content.field_machine_name[0] is not empty %}
           /* write comment here */
{% else %}
          /* write comment here */
{% endif %}

                                 OR

{% if content.field_machine_name|render %}
       /* write comment here */
{% endif %}


Note: If have any suggestions or issue regarding 'Check twig file field is empty or not' then you can ask by comments.

Tuesday, 3 July 2018

Break line in between variables of twig file.

We can break the lines in between variables in twig file with add div syntax, please have a look.

<div>{{ content.field_machine_name }}</div>   //for insert line break 

 Note: If have any suggestions or issue regarding 'Break line in between variables of twig file' then you can ask by comments.

Friday, 29 June 2018

Twig file feature in Drupal 8.

We use '.tpl.php' extension for druapl 7 but now in case of drupal 8 extension is '.html.twig'.
Lets talk about twig file..
  1. For node id in twig file syntax..  {{ node.id }}
  2. For node title in twig file syntax.. {{ node.label }}
  3. For node body in twig file syntax.. {{ node.body }} 
  4. For node any field.. {{ content.field_machine_name[0] }} or {{ content.field_machine_name.0 }}
if else syntax..

{% if ... %}
            /* write comment here */
{% else %}
           /* write comment here */
{% endif %}


For create variable in twig file syntax..
 
{% set variable name = "variable value" %}  then write {{  variable name }} and use it easily.

 Note: If have any suggestions or issue regarding 'Twig file feature in Drupal 8' then you can ask by comments.

How to resolve max execution time error in drupal ?

When you found error regarding 'max_execution_time' exceed, then you can follow steps for resolve this error: Steps:   You can put t...